프로젝트 생성

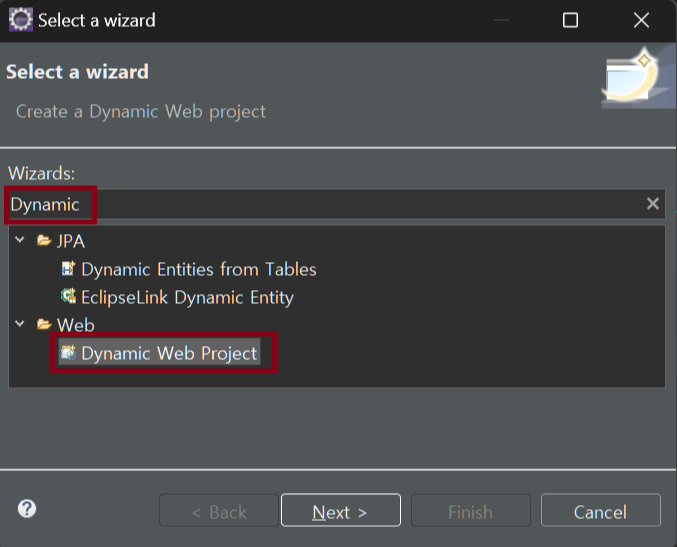
생성에 Dynamic Web Project 생성버튼이 안보이니 프로젝트를 클릭후 검색
Dynamic Web Project 선택

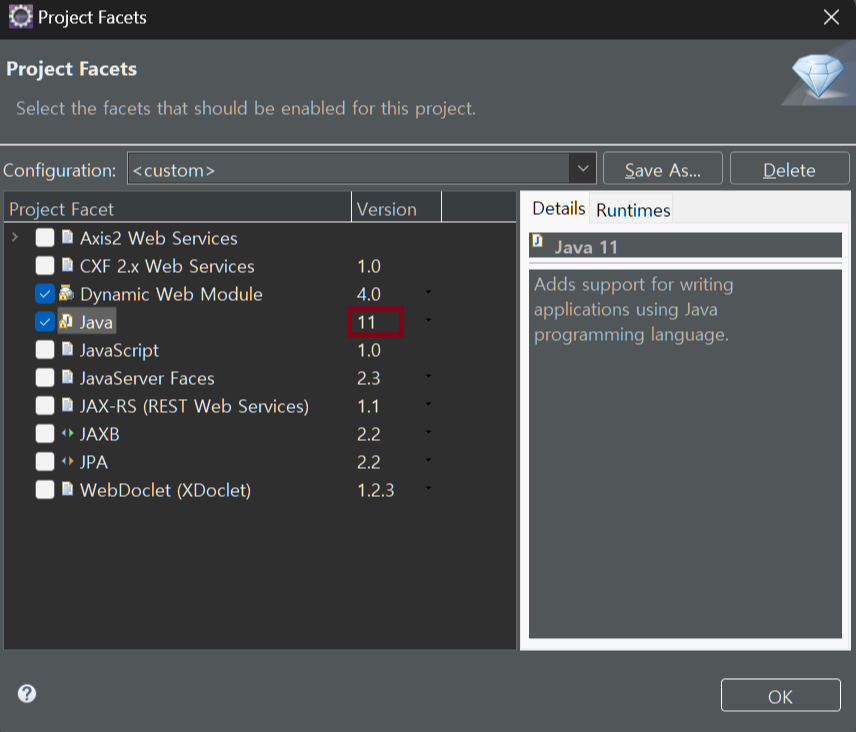
그다음 프로젝트 이름을 입력
Dynamic web modul version이 기본은 5.0으로 되어있을텐데 5.0은 Tomcat 10이상부터 가능하지만
저희는 Tomcat 9를 사용할것이기에 4.0으로 변경(변경 안할시 추후 Tomcat추가시 추가시킬께 없다고 나옴)
아래 Configuration 의 Modify 클릭 java 버전을 11버전으로 바꾸겠습니다


Add Folder를 클릭
xml은 자바폴더에 넣지 않기위해 src/main/resources 폴더를 생성
next를 클릭후 Contnet directory이름을 WebContent로 변경


web.xml에 들어가 index.html을 제외한 나머지를 삭제해줍니다
그리고 아래코드를 복사해 servelt을 정의해줍니다
<!-- Spring servlet start -->

<servlet>
    <servlet-name>pf</servlet-name>
    <servlet-class>org.springframework.web.servlet.DispatcherServlet</servlet-class>
    <load-on-startup>1</load-on-startup>
</servlet>

<servlet-mapping>
    <servlet-name>pf</servlet-name>
    <url-pattern>*.do</url-pattern>
</servlet-mapping>
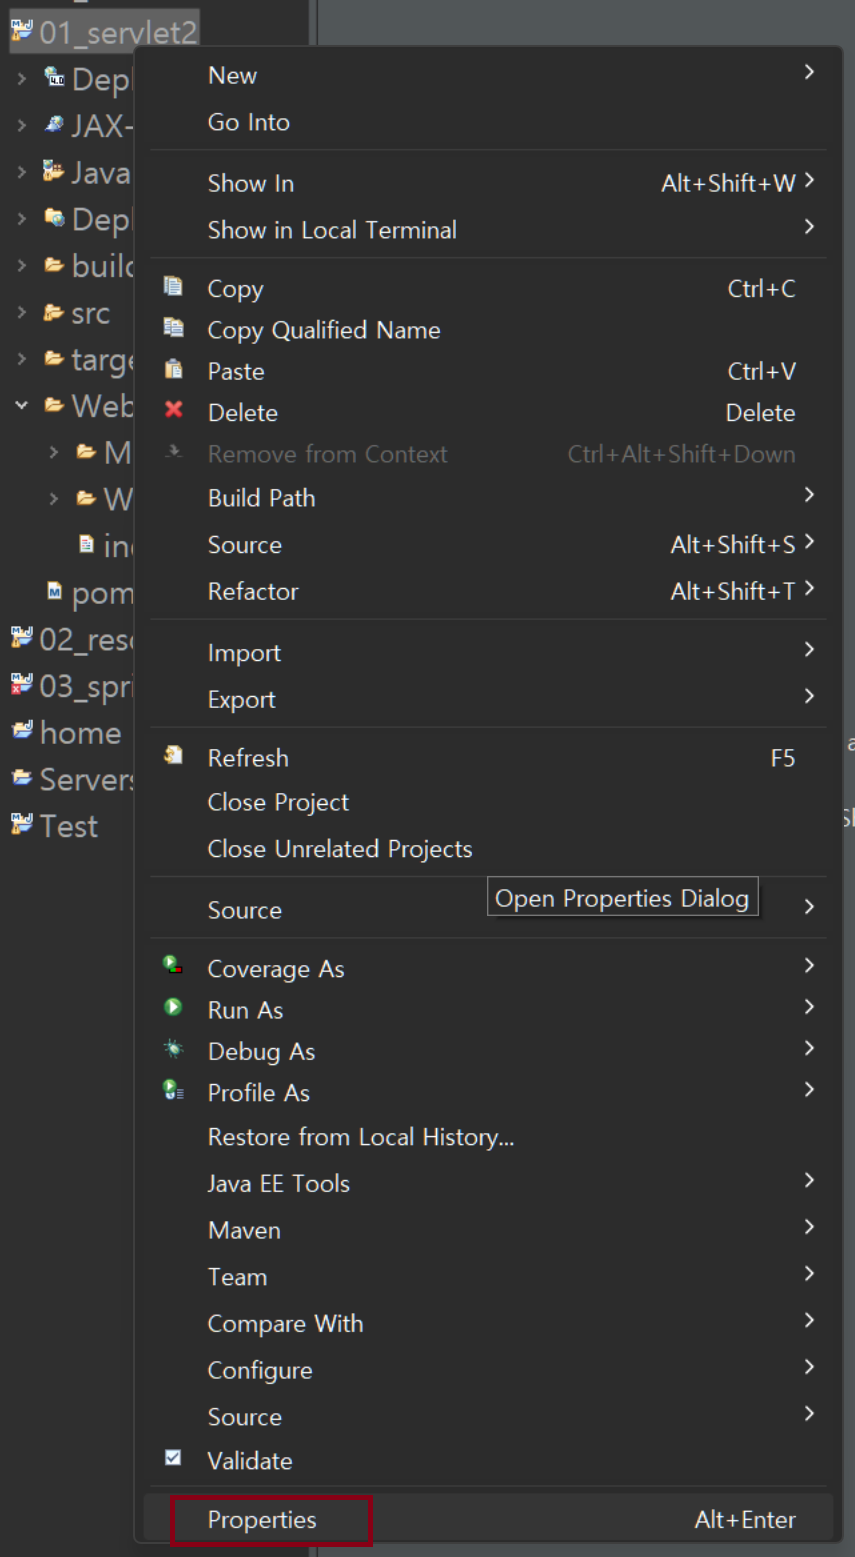
프로젝트 우클릭 - Properties (윈도우 Alt+Enter 사용하면 편함) 클릭(프로젝트의 속성)

Web Project Settings에 가서 context root를 짧게 01로 바꿔주겠습니다
기본적으로 context root는 프로젝트명이랑 같으며 context root가 길면 불편하기에 짧게 바꿔줍니다
또는 프로젝트를 local기준으로 복사를해서 기존에 있는것과 동시에 내 local에서 돌리고 싶을때 context root를 변경

Resource에 들어가 encoding을 UTF-8로 맞춰줍니다
Tip.
그리고 Location에 아이콘을 누르면 그 위치로 파일탐색기가 열립니다

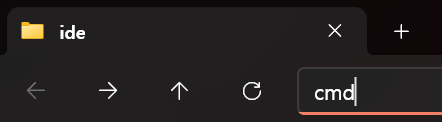

그리고 탐색기 주소창에 cmd를 입력하고 enter를 해주면 현재폴더위치의 cmd가 open됩니다
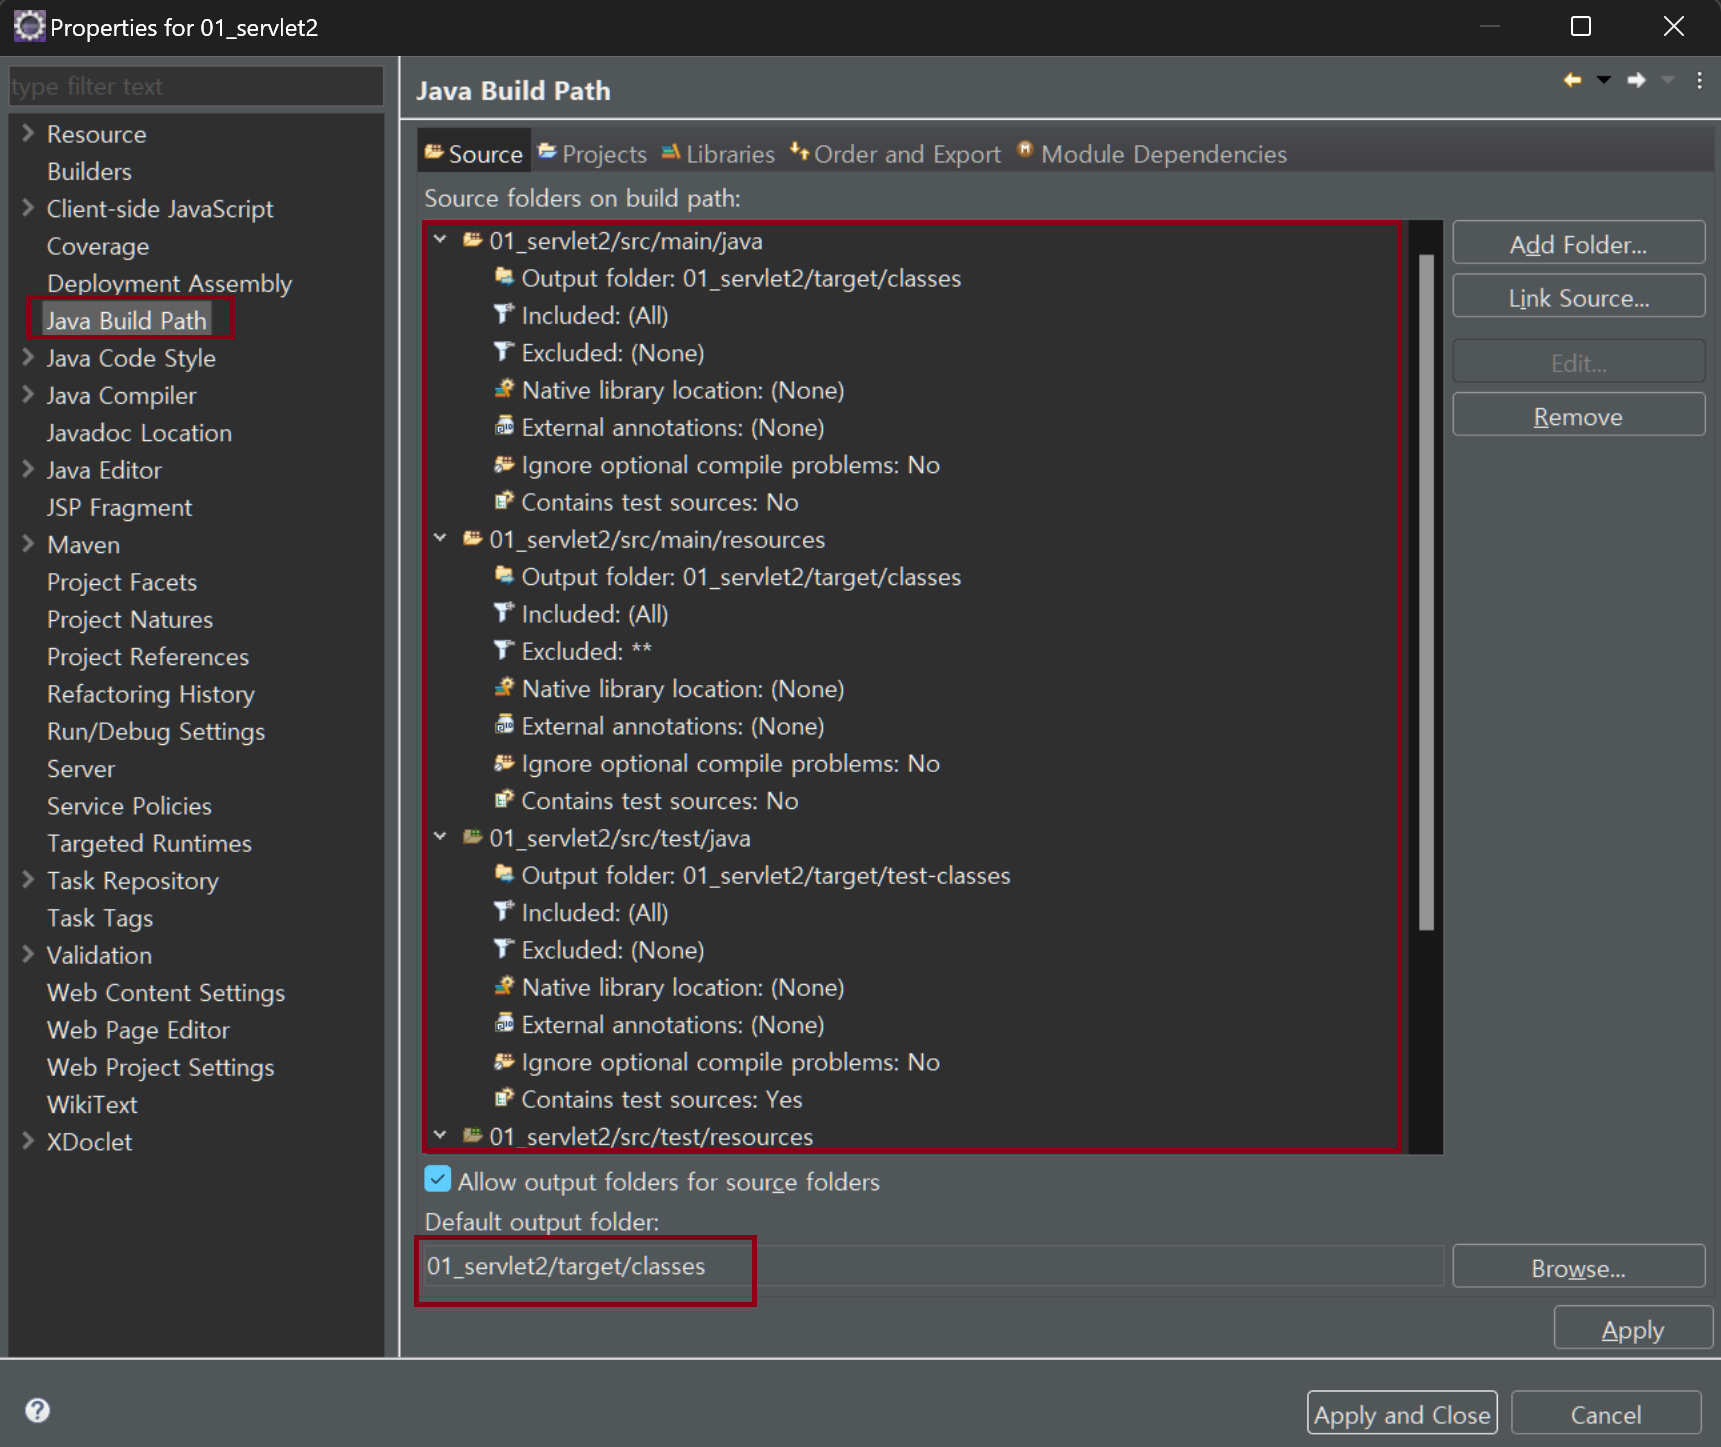
Java Buid Path -> 여기에 적혀진것들이 build/classes에 들어갑니다
여기 있는것을이 컴파일 등이 되어 Defult output folder인 패키지명/target/classes로 들어갑니다
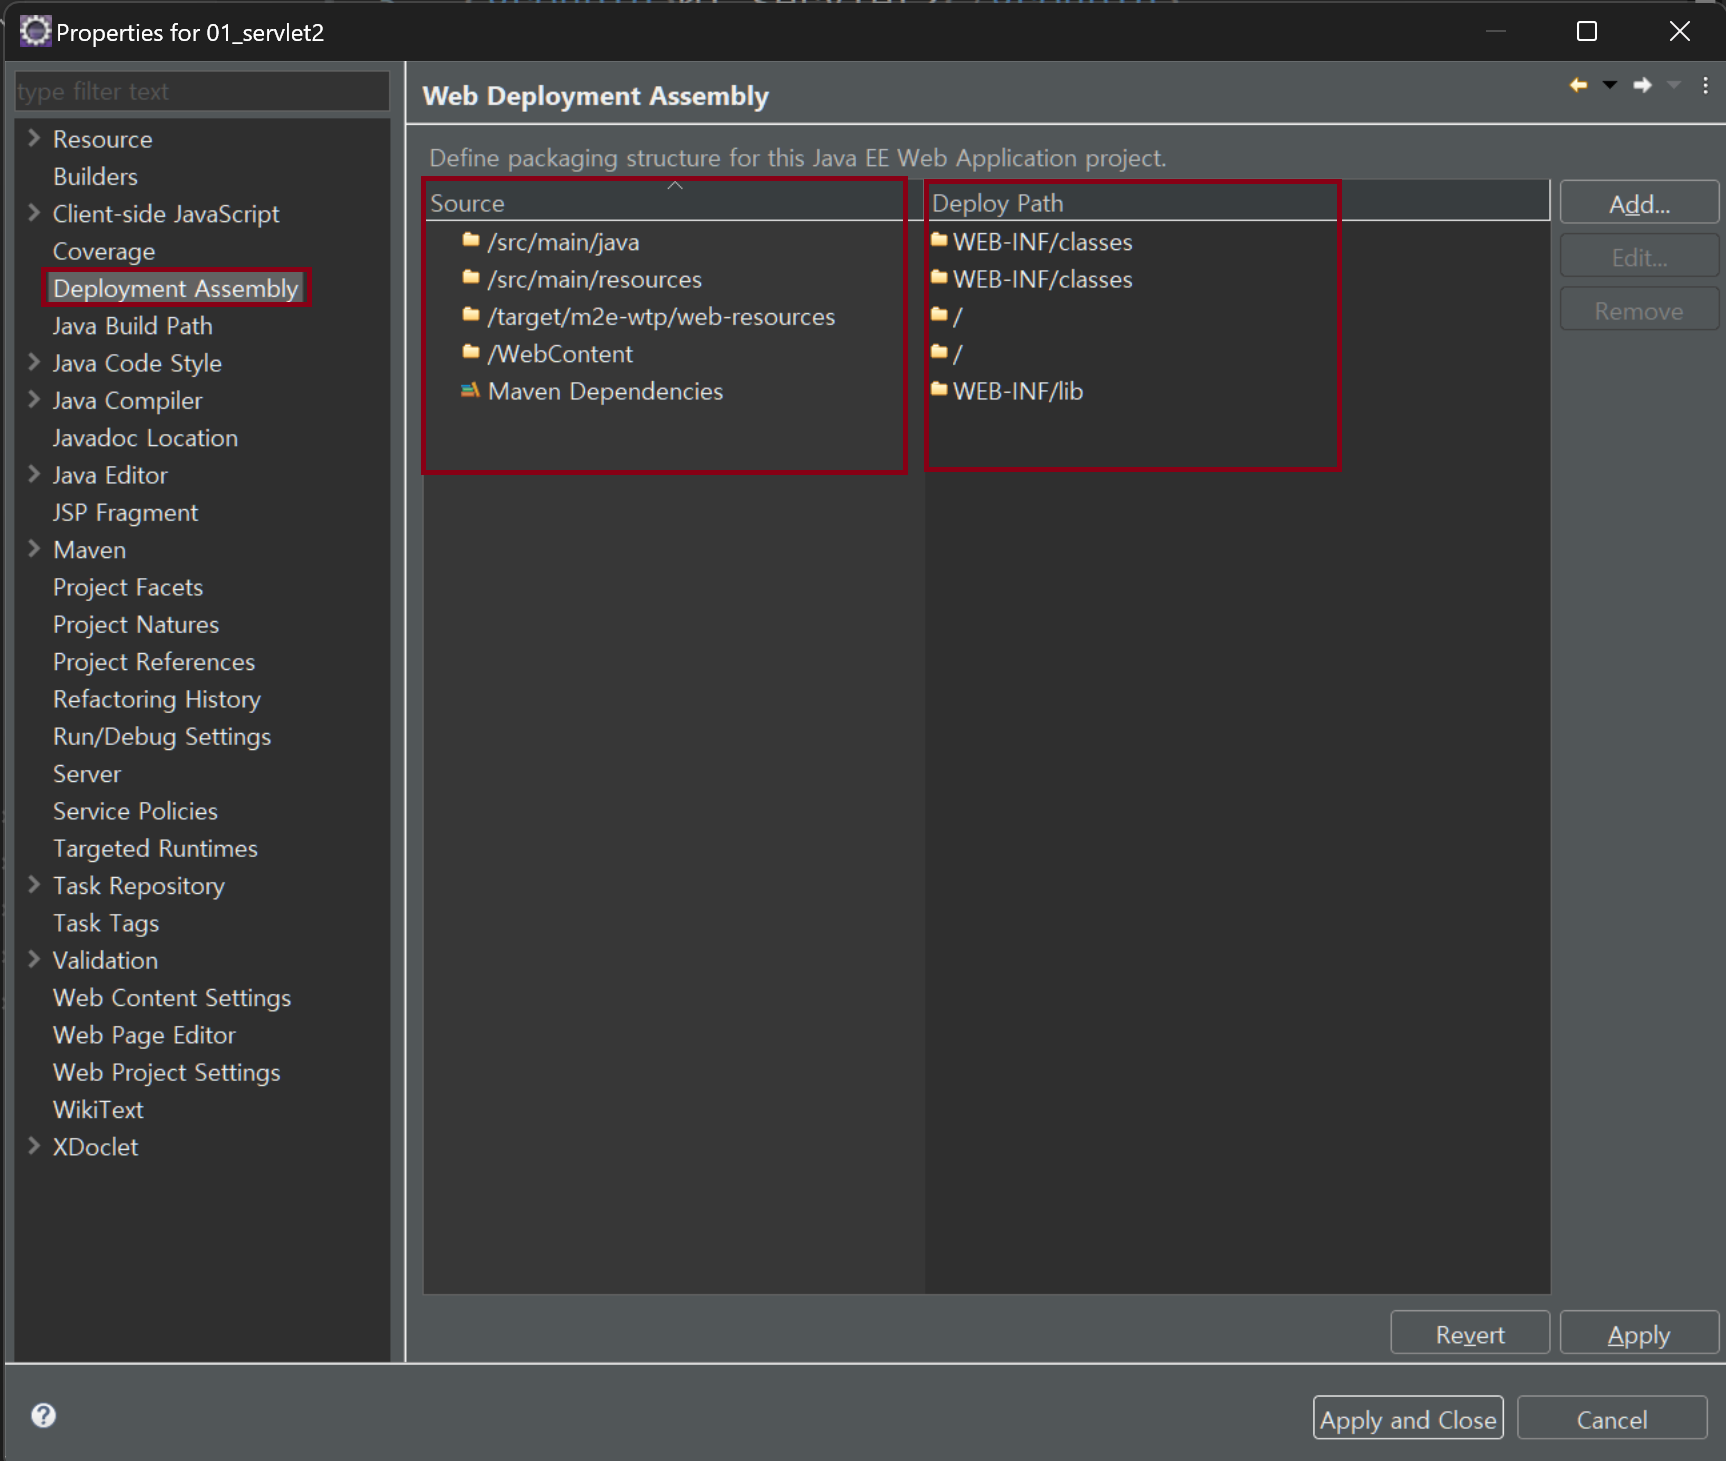
Deployment Assembly 클릭
좌측 Source , 우측 Deploy Path
여기있는건 실제 배포를 하게되면 좌측 Source들이 우측 Deploy Path쪽으로 다 복사가 된다
src/main/java와 resources는 WEB-INF/classes로 들어가고
WebContent는 /(root)로가는데 jsp,web,css,js등 사용자가 직접봐야하는 파일이기에 따로 숨기지 않고
사용자가 찾아갈 수 있게 root에 둡니다
그러면 이제 세팅이 잘되었나 확인해보기위해
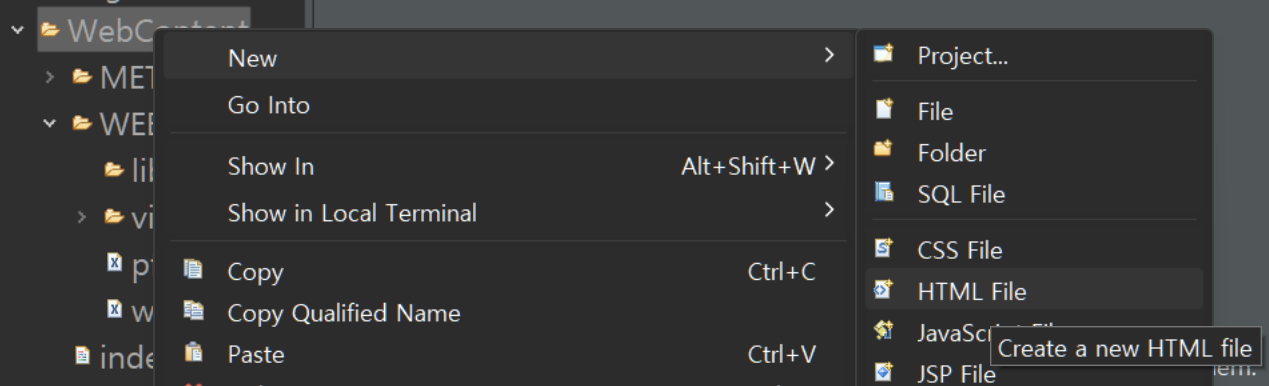
WebContent에 index.html을 만들겠습니다 test용으로 body에 hello라 작성하겠습니다
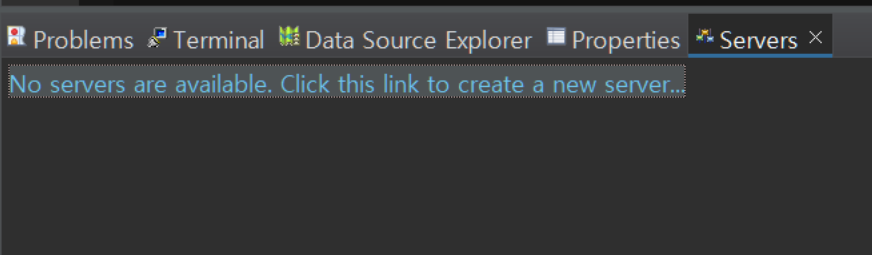
그러고 하단 Servers를 클릭후 서버를 추가해줍니다
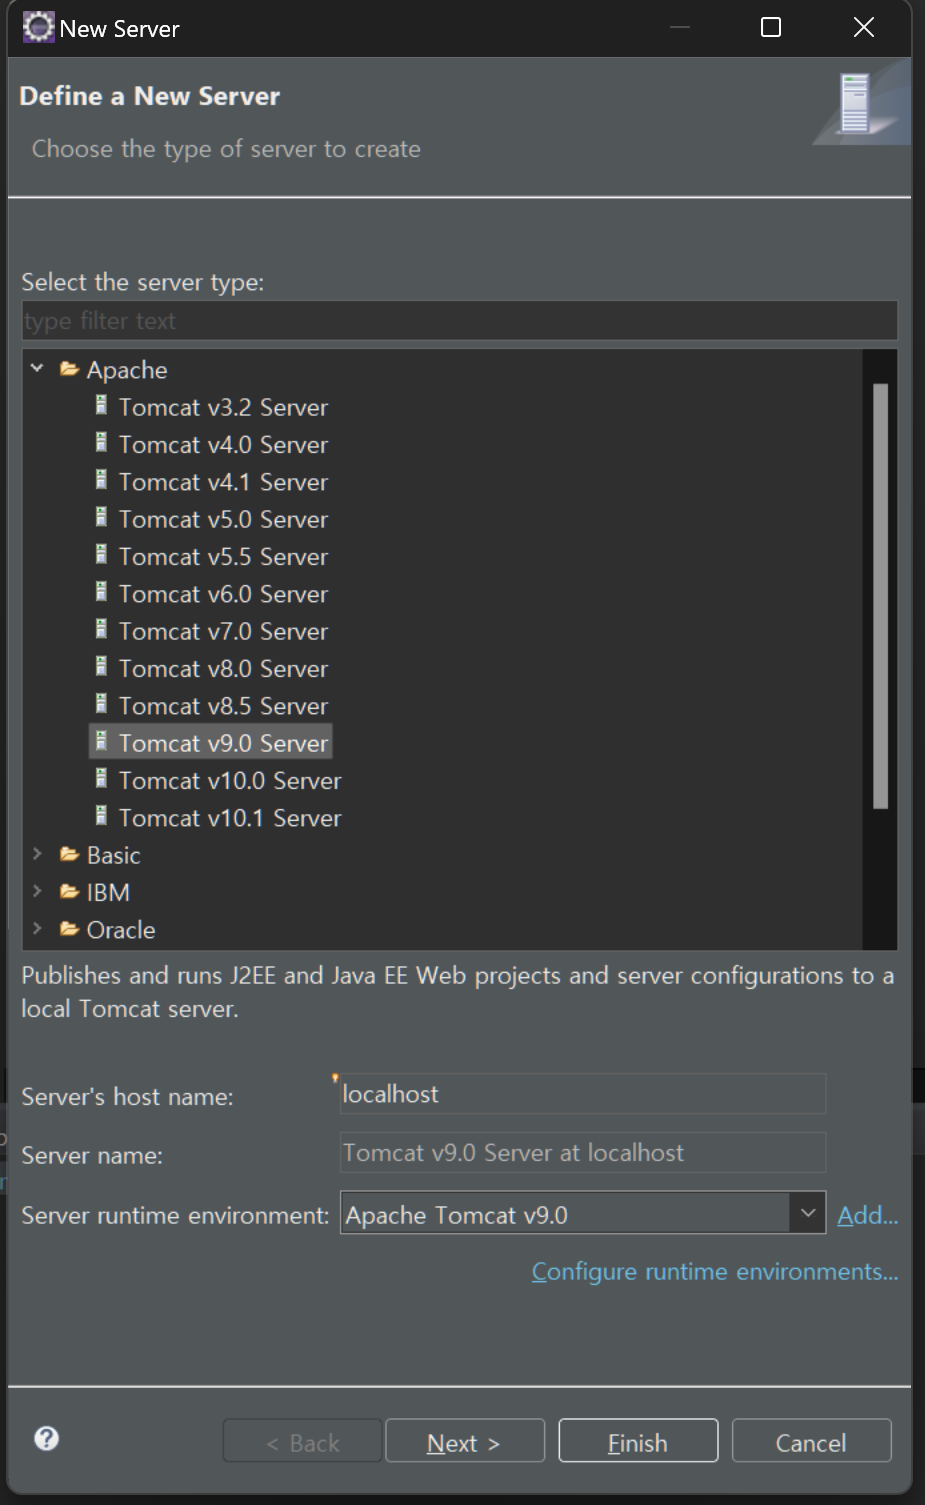
Apache의 Tomcat v9.0으로 선택 next
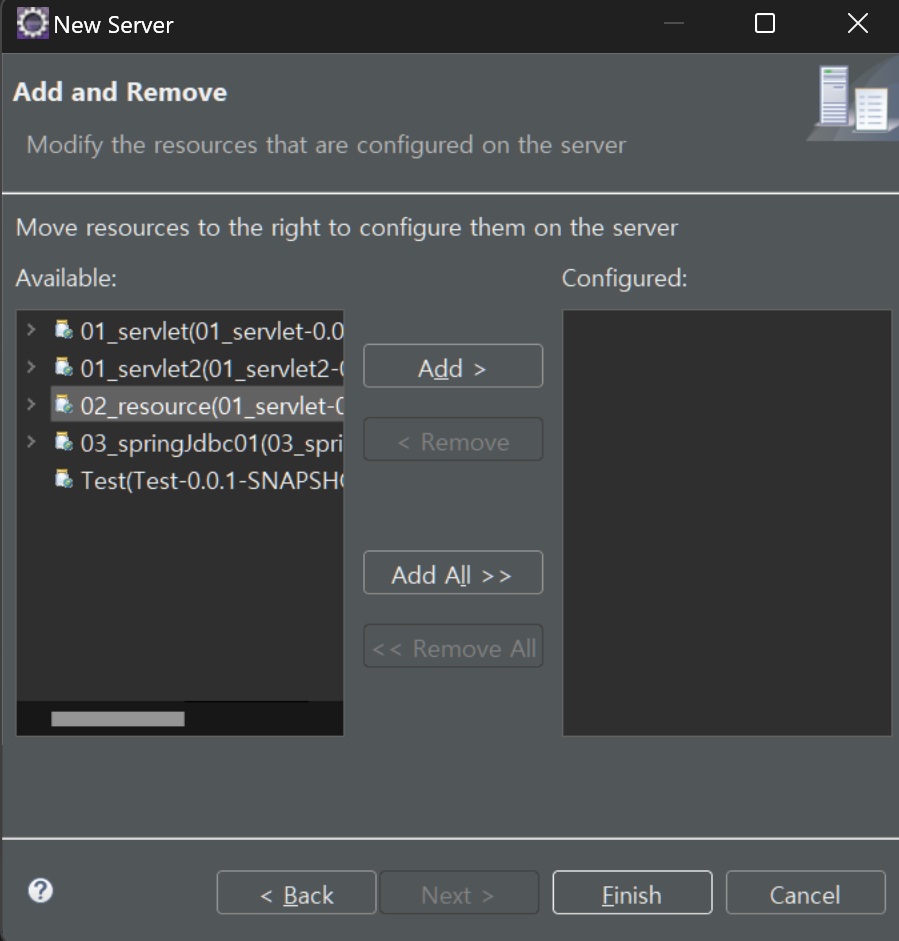
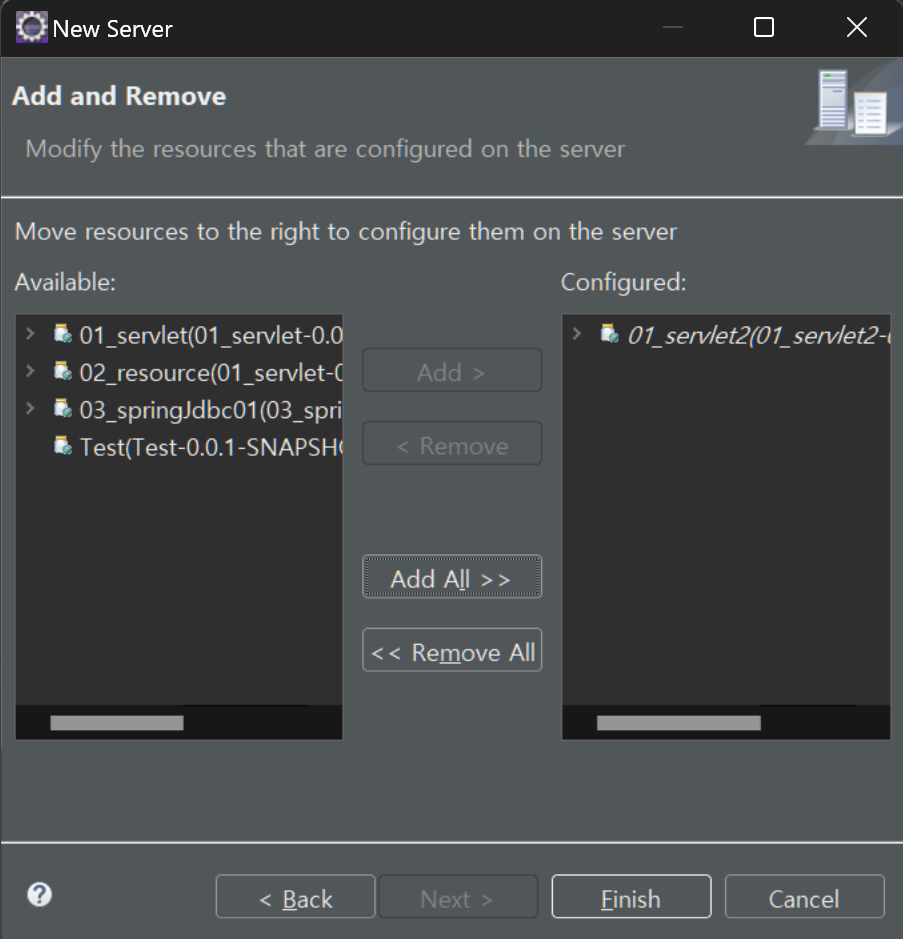
그다음 서버에 넣어줄 패키지를 선택후 add를 클릭
그러면 우측처럼 패키지가 이동한게 보일겁니다


그다음 이제 추가된 Tomcat을 우클릭후 Start를 눌러줍니다
이제 인터넷 주소창에 http://localhost:8080/01 이라 입력하면 html에 넣은 hello가 잘 출력되면 성공
http://localhost:8080/01/index.html 까지 입력안해도 바로 연결되는 이유는 web.xml에 welcome-file에 index.html이 설정되어있어 index.html 부터 검색
web.xml은 프로젝트가 최초에 실행이되거나 톰캣에 올라가면 web.xml에서부터 시작
web.xml의 역활은 이 프로젝트가 무엇으로 구성되어있는지 간략하게 설정하는 곳(000에 00이있다 같은)
Tip.
쇼핑몰 첫홈페이지는 하나의 html이다 홈페이지에 많은걸 붙여넣는데 여기에 sevlet등을 붙여놓으면 접속자가 몰리면 서버가 터지기 때문이다 (홈페이지는 접속자가 많이 몰릴 수 있기 때문)
그래서 홈에서 원하는걸 클릭해야 서버랑 통신을 하도록 만들어 놓는다

프로젝트 우클릭 후 configure > Convert to Maven Project


그러면 pom.xml 파일이 생성됩니다
mvnrepository.com 에서 spring-web 검색 후 5.3.34 버전의 maven xml 복사 pom에 붙여넣기 해줍니다
(버전 5버전대와 6버전대는 설정이 완전 다르기에 5버전 제일 마지막인 5.3.34로 하였습니다)
윈도우기준 Alt + F5를 눌러주면 우측하단 다운로드가 시작
<dependencies>
    <dependency>
        <groupId>org.springframework</groupId>
        <artifactId>spring-web</artifactId>
        <version>5.3.34</version>
    </dependency>
</dependencies>
이것만 추가하고 톰캣 실행하면 에러가 발생

추가로 spring-context와 spring-webmvc를 추가하고 돌려보면 에러가 발생하지만 에러 메시지가 바뀝니다
<dependencies>
    <dependency>
        <groupId>org.springframework</groupId>
        <artifactId>spring-web</artifactId>
        <version>5.3.34</version>
    </dependency>
    <dependency>
        <groupId>org.springframework</groupId>
        <artifactId>spring-context</artifactId>
        <version>5.3.34</version>
    </dependency>
    <dependency>
        <groupId>org.springframework</groupId>
        <artifactId>spring-webmvc</artifactId>
        <version>5.3.34</version>
    </dependency>
</dependencies>
다 붙여넣었으면 윈도우기준 Alt + F5를 눌러주면 우측하단 다운로드가 시작됩니다
다운완료후 톰캣을 실행해보면 에러가 발생합니다

FileNotFoundException이 발생하는데
이유는 web.xml는 웹이 돌아가니 servlet이 있다고 판단하여 servelt을 찾습니다
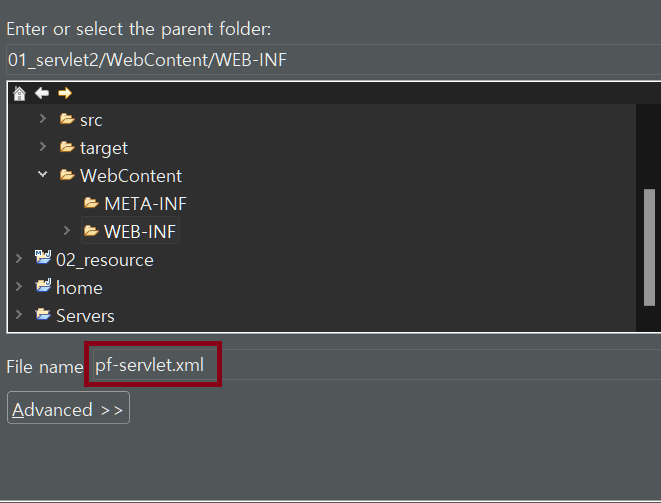
web.xml에 우리가 pf를 정의해놨는데 자동으로 -servlet을 붙여 pf-servlet.xml을 찾습니다
하지만 우리는 아직 pf-servlet.xml을 만들지 않았기에 FileNotFoundException이 발생합니다
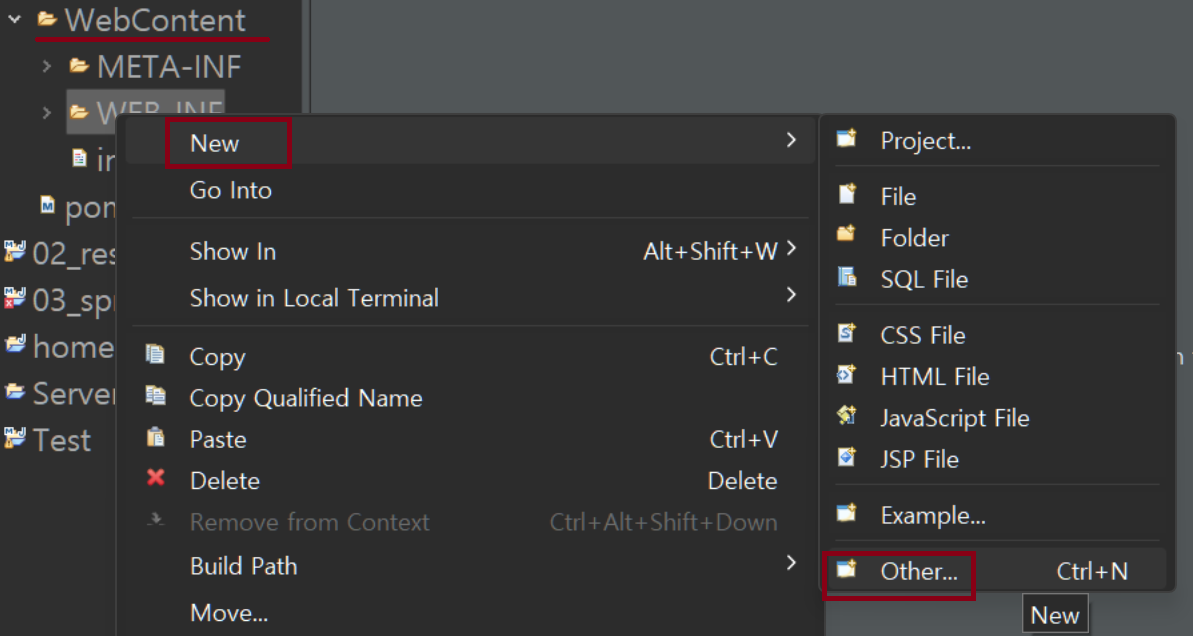
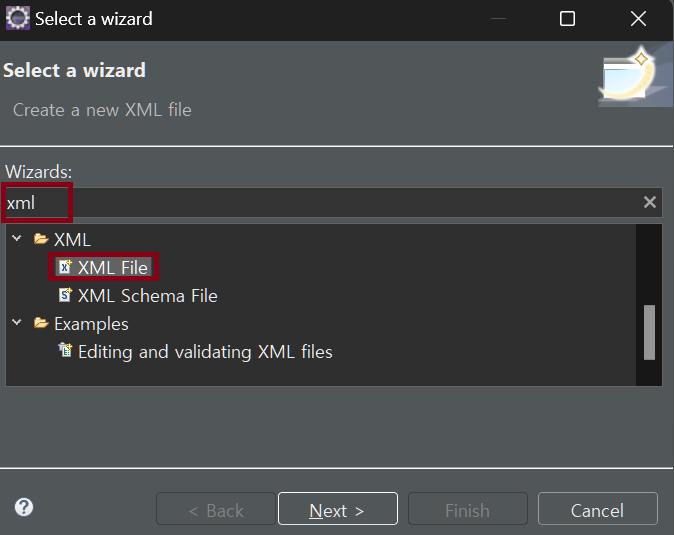
WebContent -> WEB-INF에 pf-servlet.xml 파일 생성
pf-servlet.xml에 아래 코드 추가
<?xml version="1.0" encoding="UTF-8"?>
<beans xmlns="http://www.springframework.org/schema/beans"
	xmlns:context="http://www.springframework.org/schema/context"
	xmlns:xsi="http://www.w3.org/2001/XMLSchema-instance"
	xmlns:tx="http://www.springframework.org/schema/tx"
	xmlns:mvc="http://www.springframework.org/schema/mvc"
	xsi:schemaLocation="
        http://www.springframework.org/schema/beans
        http://www.springframework.org/schema/beans/spring-beans-4.1.xsd
        http://www.springframework.org/schema/mvc
        http://www.springframework.org/schema/mvc/spring-mvc-4.1.xsd
        http://www.springframework.org/schema/tx
        http://www.springframework.org/schema/tx/spring-tx-4.1.xsd
        http://www.springframework.org/schema/context
        http://www.springframework.org/schema/context/spring-context-4.1.xsd">

	<!-- The controllers are auto-detected POJOs labeled with the @Controller
		annotation. -->
	<!-- 컨트롤러는 @Controller 어노테이션을 사용하여 자동으로 감지되는 POJO입니다. -->
	<context:component-scan
		base-package="com.portfolio.www" use-default-filters="false">
		<context:include-filter type="annotation" expression="org.springframework.stereotype.Controller" />
	</context:component-scan>

	<!-- JSP 뷰 리졸버 설정 -->
	<bean
		class="org.springframework.web.servlet.view.InternalResourceViewResolver">
		<property name="prefix" value="/WEB-INF/views/" />
		<property name="suffix" value=".jsp" />
	</bean>

	<!-- css,js 서블릿이 인식을 못해서 작성한 것, resources폴더 만들기 -->
	<!-- localhost:8088/spring/resources 자원으로 설정(서블릿에서 빼버린다) -->
	<mvc:resources mapping="/resources/**" location="/resources/" />

	<!-- 애노테이션 기반 MVC 지원 활성화 -->
	<mvc:annotation-driven />

</beans>
Tip.
xml은 태그만 있는게 아니라 네임스페이스와 쌍으로 움직인다
<context:component-scan
	base-package="com.portfolio.www" use-default-filters="false">
	<context:include-filter type="annotation" expression="org.springframework.stereotype.Controller" />
</context:component-scan>
을 보면 앞에 context가 네임스페이스가 된는데(bean은 네임스페이스 없음)
위에 코드 상단에 xmlns (xml네임스페이스 약자)로 정의
xmlns:context :뒤에는 일종의 변수명과 같다
xmlns:mvc="http://www.springframework.org/schema/mvc" 네임스페이스가 태그를 가지고잇는데
http://www.springframework.org/schema/mvc/spring-mvc-4.1.xsd 에 있다
(주소창에 넣으면 태그 나옴 그걸 확인하고 써야한다)
bean은 맨 앞줄이라 네임스페이스 생략하면
<bean
    class="org.springframework.web.servlet.view.InternalResourceViewResolver">
    <property name="prefix" value="/WEB-INF/views/" />
    <property name="suffix" value=".jsp" />
</bean>
로 작성가능
태그 정의하려면 위에 xmlns를 보고 정의해야한다
<<<<<<<<<<<<<<< pf-servlet.xml 설명 >>>>>>>>>>>>>>>
1.component-scan
서블릿을 web.xml이 설정파일 하나씩 읽어오는데 첫번째로 읽어오는게 컴포넌트 스캔이다
<!-- 컨트롤러는 @Controller 어노테이션을 사용하여 자동으로 감지되는 POJO입니다. -->
	<context:component-scan
		base-package="com.portfolio.www" use-default-filters="false">
		<context:include-filter type="annotation" expression="org.springframework.stereotype.Controller" />
	</context:component-scan>
expression : 표현식
컨포넌트 스캔은 스핑링에서 사용할 빈(컨포넌트)을 스캔하는것이다(베이스 패키지부터 읽어옴)
베이스 패키지부터 읽어오며 안에있는 filer를 가지고 가져온다
filter : 타입은 어노테이션으로( 어노테이션이 붙은것 중에) 표현식(무슨 어노테이션?)은 000Controller 로 컨포넌트 스캔할 수 있다
즉, 베이스 패키지 아래 Controller라 붙은 어노테이션은 다 스프링이 찾는다
2. ViewResolver
<bean
    class="org.springframework.web.servlet.view.InternalResourceViewResolver">
    <property name="prefix" value="/WEB-INF/views/" />
    <property name="suffix" value=".jsp" />
</bean>
이것은 jsp(중요한 파일)를 어딘가에 둬야하는데 중요하니 감춰야한다 WEB-INF안에 놔두면 감출 수 있다
WebContent에 있는건 다 밖으로 나오는데 WEB-INF 만 무조건 예외로 감춰진다
숨겨놓았지만 찾아갈때마다 경로를 입력하면 힘들기에 prefix로 기본경로를 설정하고 suffix에서 . jsp로 된 파일을 조건으로 하고 /WEB-INF/views/000.jsp 에서 000만 우리가 정의한다고 ViewResolver에 우리가 정의하는것이다
'공부 > 그룹 스터디' 카테고리의 다른 글
| [3회차 02] DBeaver 설치 & 설정 (0) | 2024.04.17 |
|---|---|
| [3회차 01] Docker 간단 사용법 (0) | 2024.04.16 |
| [1회차 0] 초기 세팅 (0) | 2024.04.16 |
| [2회차 03] mvc:resources 란? (0) | 2024.04.16 |
| [2회차 02] Controller생성 (0) | 2024.04.16 |